Cleaning Hacks for Those Tricky Adjustable Trivet Gaps!
I’ll never forget the first time I actually looked closely at my adjustable trivet after months of daily use. You know the one — that expandable silicone or metal frame with all those little gaps you’re supposed to adjust for different pot sizes? Yeah, that thing. I thought I was being so smart buying it, but when I finally flipped it over and saw the crusty, greasy buildup wedged in every single crevice, I honestly winced. Those gaps might be great for heat insulation and stability, but they’re basically a magnet for oil, crumbs, and mystery gunk. After a few rounds of trial and error (and some very frustrated scrubbing), I’ve landed on a handful of hacks that actually work without making you want to throw the whole trivet away.
Why Those Gaps Are Such a Pain
Here’s the thing — adjustable trivets are designed to expand and contract, so the joints and slots are inevitable. But that same design feature creates tiny pockets where water and grease love to hide. If you’ve got a silicone trivet, it’s even worse because oil sticks to the surface like it’s getting paid rent. I once left mine sitting for a week after a big pasta night, and by the time I went to clean it, the leftover tomato sauce had turned into a sticky orange brick inside every slot. Ugh.
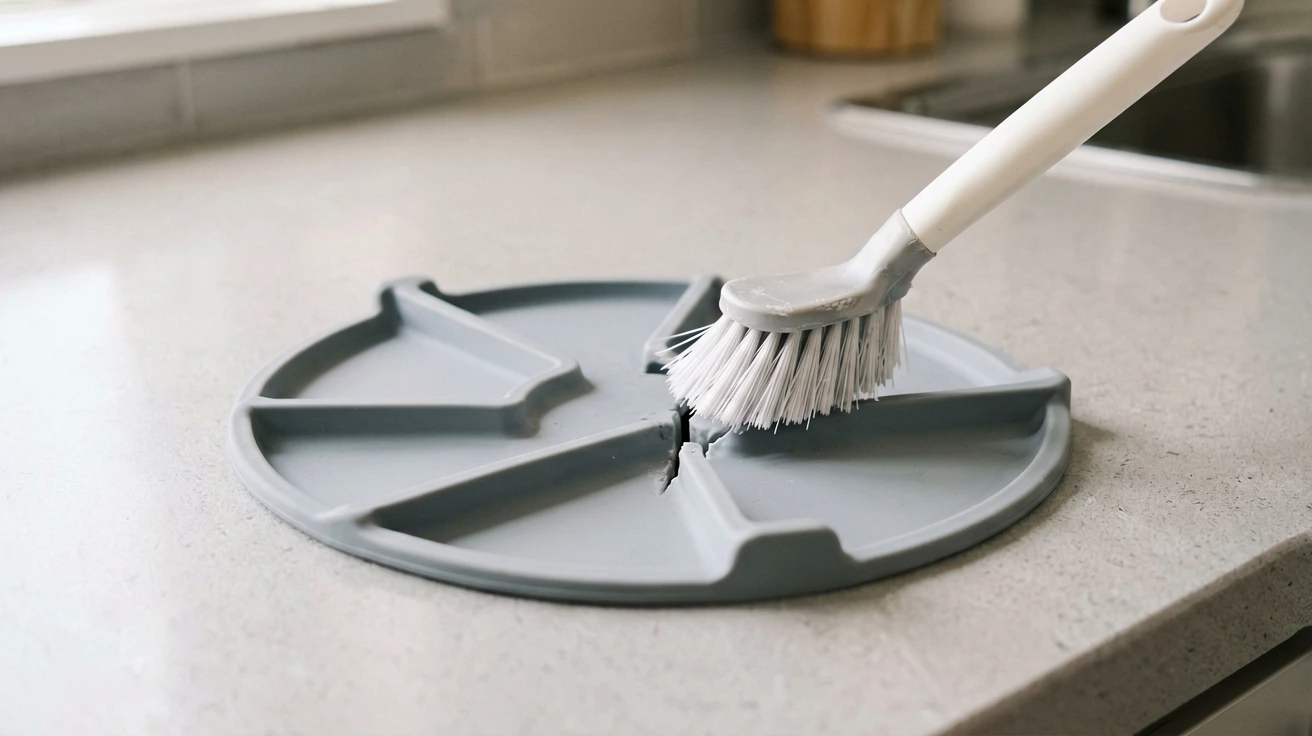
Hack #1: The Toothbrush & Dish Soap Duo
My go-to is actually an old toothbrush (not the one you use on your teeth, obviously). I squeeze a generous amount of dish soap straight onto the brush, then scrub each gap in a back-and-forth motion. The bristles reach deep into those narrow spaces way better than any sponge ever could. Rinse with hot water, and most of the gunk slides right out. For stubborn spots, I let the trivet soak in hot soapy water for 15 minutes first — makes a world of difference.
Hack #2: Baking Soda Paste for the Stubborn Stuff
When the grease has really baked in (especially after roasting or searing), I mix baking soda with a tiny splash of water to form a thick paste. I rub that paste into every gap with my fingers or the toothbrush, let it sit for 10 minutes, then scrub again. The paste acts like a gentle abrasive that lifts the grime without scratching the silicone or metal. I’ve even used it on those telescopic metal trivets with the little sliding bars, and it brought them back to looking almost new.
Hack #3: The Toothpick Trick
For the truly tiny gaps — like the ones between the overlapping sections of an expandable trivet — a toothpick is your best friend. I just poke it along each groove to dislodge any trapped food particles. Then I follow up with the toothbrush step. It sounds tedious, but it takes maybe two minutes and saves you from having to soak or scrub for ages.
Hack #4: Dishwasher? Only If It Says So
I know some people throw their adjustable trivets straight into the dishwasher. I’ve done it too, but only if the manufacturer explicitly says it’s dishwasher-safe. The high heat and strong jets can sometimes warp thinner silicone or loosen the sliding mechanism. When I do use the dishwasher, I place the trivet on the top rack and make sure it’s not touching the heating element. Even then, I still give the gaps a quick hand rinse afterward to check for any leftover bits.
A Little Prevention Goes a Long Way
Honestly, the best hack I’ve learned is just to rinse the trivet right after I use it, before the food residue has a chance to dry and glue itself into the gaps. A quick swipe under hot running water and a shake dry takes ten seconds, and it keeps the deep cleaning sessions to once every couple of weeks instead of every single time.
So next time you’re staring at your adjustable trivet wondering why it looks like it’s been through a war, grab an old toothbrush and some dish soap. Your future self — and your pristine countertop — will thank you.
Join Discussion
那个番茄酱粘在缝里的画面我太有同感了,每次清理都崩溃😩